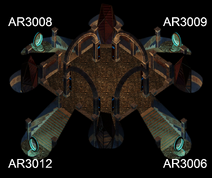
The Compass Level (aka Maze Level) is the 3rd level of Watcher's Keep.
Walkthrough[]
- Throughout this level the portal are set by the primary directions (N/E/S/W), rotated 45 degrees counter-clockwise. That is: North points to the upper left of the screen, East the upper right, South the lower right, and West as the lower left.
- At the beginning of the Compass Level, the party will meet an Elven Madman who refers to himself as Yakman. Follow him through the south portal.
- Speak to Yakman by his camp and he will provide information about the level. It is a maze of portals filled with demons. He will also describe how to fix the broken portal that leads to the next level. Yakman can be cured of his madness with a level 6 Heal spell for 5000 XP for each party member. Take the Scepter of Radiance from Yakman's camp, making sure to remove the trap first.
- Enter the portal to the north to return to the first room (3003).
- Note: The quickest path skips the wild magic Quasit room (3009). If you wish to explore it, take the west portal from the first room (3003), kill the Quasits, then enter the north portal to return to the first room (3003).
- From the first room (3003), take the east portal (to room 3008) and then the east portal again (to room 3012) to find Tahazzar, a powerful Tanar'ri. Defeat the Tanar'ri to get one of the Scepter Gems.
- From Tahazzar's lair, take the south portal three times to reach the Ka'rashur's Baatezu encampment. Defeat him to get the second Scepter Gem.
- From Ka'rashur's lair, take the south portal, then the west portal, then the north portal three times to get to the cavern that leads to the exit.
- Note: It is possible to side with either Tahazzar or Ka'rashur to receive The Blood War quest that involves killing the other faction of the Blood War and bringing back the leader's heart. Payment for this will be the Thieves' Hood, which can't be obtained in any other way.
- The Tanar'ri Tahazzar will not give the party any chance to discuss if the protagonist is within detection range and they are a Lawful Good Cleric or Paladin. Otherwise, he will talk to the party member closest to him, but will not trust them with the quest if they are Good-aligned or Lawful Neutral — he will attack instead.
- The Baatezu Ka'rashur is easier to deal with: He will only assault the party if the protagonist is within detection range and a Lawful Good Paladin. If not, he will talk to the party member closest to him and will trust them with the quest unless they are Lawful Good or Neutral Good — in which case he will attack. Note that even a party with a Paladin protagonist can play with the detection range and manage to get the quest from Ka'rashur.
- Note: It is possible to side with either Tahazzar or Ka'rashur to receive The Blood War quest that involves killing the other faction of the Blood War and bringing back the leader's heart. Payment for this will be the Thieves' Hood, which can't be obtained in any other way.
- In the large cavern you will meet Aesgareth, an extra-planar being who loves to gamble. He will offer a wager to you. He will offer you the last Scepter Gem if you put up the rune that lets you leave the dungeon. You will each draw a card from the Deck of Many Things and whoever survives and has the highest card wins. You can try and win Spectral Brand and a scroll of Wish, also 25000 quest XP for every time you win. The last game will be for the gem: if he wins, he will still give you the last Scepter Gem and will return the rune as well; if you gamble for a way out and he loses, he and his companions turn hostile.
- With all three Scepter Gems, the Scepter of Radiance will become whole again and you will be able to enter the portal to the 4th level.
- Full path summary: S-N-(optional W-N)-E-E-S-S-S-S-W-N-N-N-Exit
Tactics
In the rooms without magic, active spellcasting (including chain spells) is blocked, but not automatic spellcasting through contingency spells. If confronted with Cornugon using demon fear, prepare beforehand the mage spell Contingency with Resist fear.
Gallery[]
Creatures[]
Enemies[]
Treasure[]
T1 (AR3011)[]
T2 (AR3011)[]
Tahazzar (AR3012)[]
T3 (AR3012)[]
- Arrow +3 (×10)
- Throwing Dagger (×2)
- Potion of Superior Healing (×2)
- 1920

Tiefling (AR3005)[]
Ka'rashur (AR3013)[]
- Ka'rashur's Heart
- Scepter Gem
T4 (AR3013)[]
- Studded Leather Armor +2
- Throwing Axe (×5)
- Arrow +3 (×10)
- Potion of Superior Healing
- Star Sapphire
- 450

- rich random treasure
(AR3008)[]
- Central Stone Column, a Lawful Good Character can pull the Purifier +4
(AR3014)[]
- Pile 1 - (right to northern portal) (496.398)
- Plate Mail +1
- rich random treasure
- Pile 2 - (between gauntlet and northern portal) (560.490)
- Wand of Spell Striking (6 charges(Breach)/5 charges(Pierce Magic))
- Potion of Superior Healing (×2)
- Bolt +2 (×20)
- wealthy random treasure
- Pile 3 - (northeast) (723.425)
- Pile 4 - (east) (1000.463)
- Plate Mail
- Agni Mani Necklace
- wealthy random treasure
- Pile 5 - (near Helm's fingertips) (765.534)
- Spear +1
- wealthy random treasure
- Pile 6 - (northwest) (347.639)
Aesgareth (AR3015)[]
- Deck of Many Things
- Scepter Gem
- Chain Mail +3
- Two-handed Sword +2
Sources & References[]
- Baldur's Gate II section at Mike's RPG Center
| Watcher's Keep |
Watcher's Keep • 1st Level: Altar • 2nd Level: Elemental • 3rd Level: Teleport Maze • 4th Level: Machine of Lum the Mad • 5th Level: Final Seal • 6th Level: Imprisoned One |


